Short answer
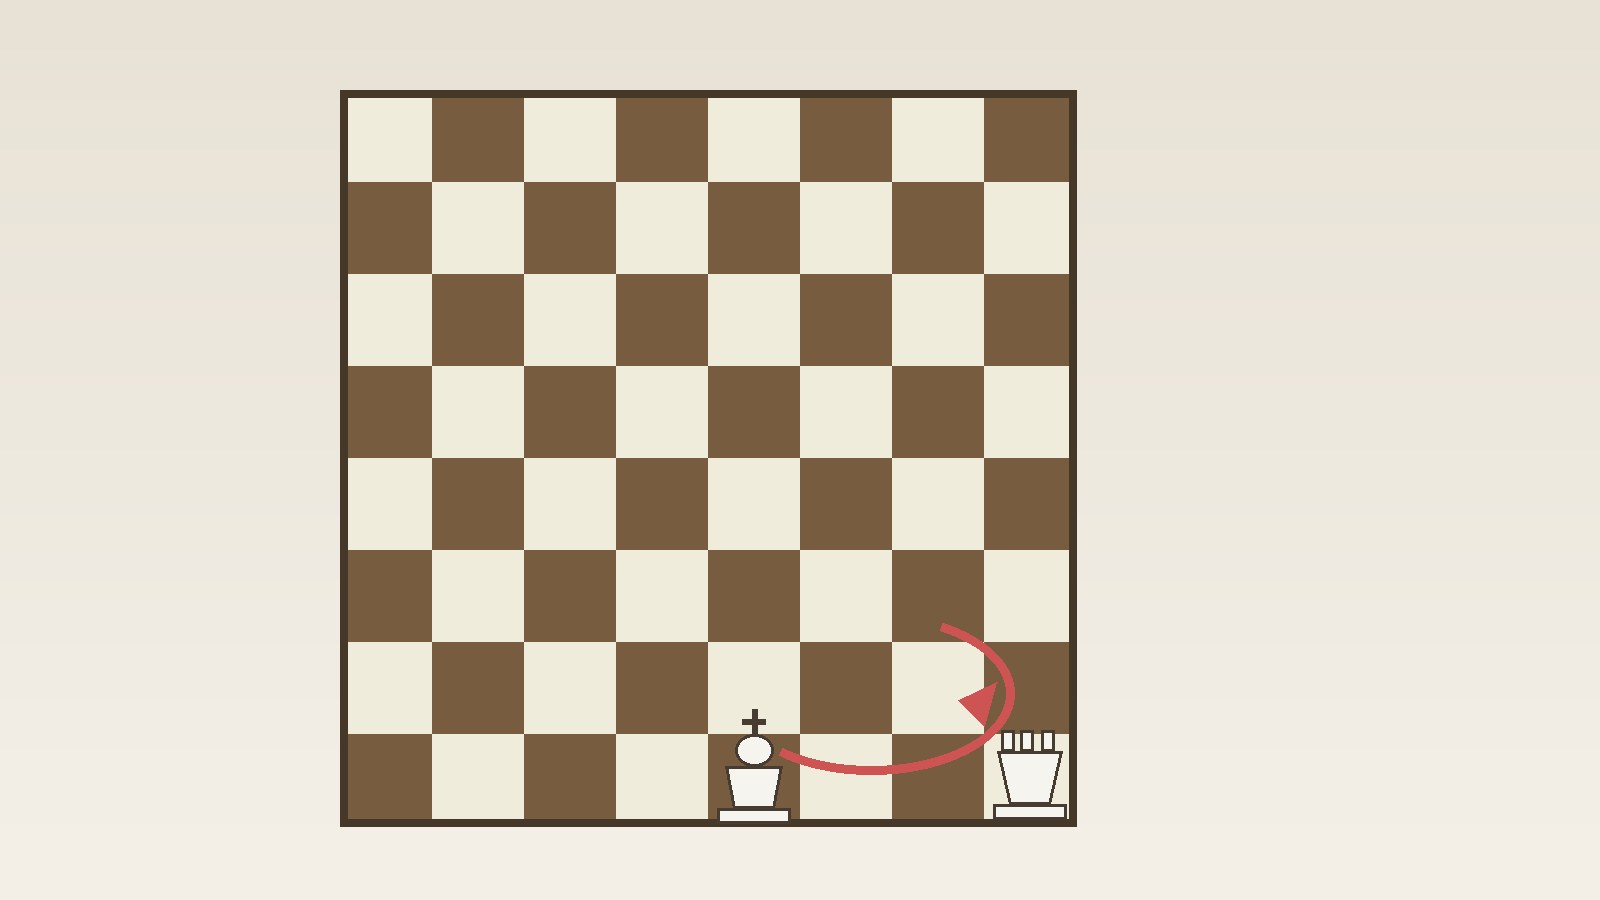
- To castle in chess, move your king two squares toward one of your rooks, then move that rook to the square the king just crossed. Kingside castling, also called short castling, is written O-O. Queenside castling, also called long castling, is written O-O-O. For White, kingside castling moves the king from e1 to g1 and the rook from h1 to f1. For White, queenside castling moves the king from e1 to c1 and the rook from a1 to d1. For Black, the same moves happen on the eighth rank: kingside castling moves the king from e8 to g8 and the rook from h8 to f8, while queenside castling moves the king from e8 to c8 and the rook from a8 to d8. Castling is legal only when all of the following are true. Neither the king nor the rook you are castling with has moved earlier in the game. Every square between the king and that rook is empty. Your king is not in check. Your king does not cross a square attacked by an enemy piece, and your king does not land on a square attacked by an enemy piece. If any one of those conditions fails, you cannot castle on that side on that move. Castling counts as a single move, and it counts as a move of the king.
Introduction
Castling looks wrong the first time you see it. Two pieces move on one turn, the king moves two squares instead of one, and the rook jumps to the other side of the king. Yet castling is a normal, legal part of standard chess. It moves the king toward a corner, where it is usually harder to attack, and it brings a rook toward the center, where it can take part in the game. This guide gives the exact squares, lists every condition that must be true, and separates cases that make castling illegal from cases that only look illegal. It follows the FIDE Laws of Chess, the international rules used for standard chess.
What Castling Is
Castling is a move of the king and either rook of the same color along the player’s first rank. The first rank is the back rank where the pieces start: the first rank for White and the eighth rank for Black. The king is transferred from its original square two squares toward the rook on its original square. Then that rook is transferred to the square the king has just crossed. The whole sequence counts as a single move of the king.
That definition explains points that beginners often miss. Castling is not two moves. You do not move the king on one turn and the rook on the next turn and call the result castling. The king defines the move, which is why, over the board, you touch the king first. Castling is also a king move, so the ordinary rule that you may not leave your own king in check applies to it. Castling is the only move in standard chess in which two pieces move on the same turn, and the only move in which the king moves two squares. The rook does not jump over a third piece. It moves to the square the king crossed after the king has moved, and the squares between the king and the rook must be empty before the move starts.
Kingside castling uses the rook on the king’s side, the rook that starts nearer the king. Queenside castling uses the rook on the queen’s side, the rook that starts farther from the king. Kingside castling is also called short castling because only two squares between the king and the rook need to be cleared. Queenside castling is also called long castling because three squares need to be cleared. The king still moves exactly two squares in both cases. Only the rook’s journey changes.
How to Castle, Step by Step
- Choose a side: kingside, with the rook nearer the king, or queenside, with the rook farther from the king. You may castle on only one side on a given turn, and only if the conditions for that side are met.
- Check that the king and the chosen rook have not moved. If either piece has moved at any earlier point, even if it later returned to its starting square, castling with that pair is no longer possible.
- Check that every square between the king and the chosen rook is empty. No piece of either color may stand on any of those squares.
- Check that your king is not in check, and that the square the king will cross and the square the king will land on are not attacked by an enemy piece. The attack check applies to the king’s squares only.
- Move the king two squares toward the chosen rook. Over the board, pick up the king first.
- Move the chosen rook to the square the king just crossed. That rook finishes immediately beside the king.
- Complete the move as one move. Press your clock, if you are using one, only after both pieces are placed.
Kingside castling, square by square
Kingside castling is written O-O. It is usually quicker to prepare than queenside castling, because only the kingside knight and bishop need to leave their starting squares, while the queen can stay where it is. For White, the king starts on e1 and the rook starts on h1. The squares between them, f1 and g1, must be empty. The king moves from e1 to g1, crossing f1. The rook then moves from h1 to f1. The final position has the king on g1 and the rook on f1. For Black, the mirror image applies: the king moves from e8 to g8, crossing f8, and the rook moves from h8 to f8.
A short opening sequence shows the preparation. After 1. e4 e5 2. Nf3 Nc6 3. Bb5 a6 4. Ba4 Nf6, White has moved the kingside knight from g1 to f3 and the kingside bishop from f1 to a4. The squares f1 and g1 are empty, the king and rook have not moved, and the king is not in check and does not cross or land on an attacked square. White can therefore play 5. O-O.
Queenside castling, square by square
Queenside castling is written O-O-O. It takes more preparation because three pieces must leave the back rank: the queenside knight, the queenside bishop, and the queen. For White, the king starts on e1 and the rook starts on a1. The squares between them, b1, c1, and d1, must all be empty. The king moves from e1 to c1, crossing d1. The rook then moves from a1 to d1. The final position has the king on c1 and the rook on d1. For Black, the mirror image applies: the king moves from e8 to c8, crossing d8, and the rook moves from a8 to d8.
An illustrative sequence shows the extra preparation. Suppose White plays 1. d4 d5 2. Bf4 Nf6 3. Nc3 e6 4. Qd2. The bishop has left c1, the knight has left b1, and the queen has left d1, so b1, c1, and d1 are empty. If the king and rook have not moved, the king is not in check, and Black’s reply leaves e1, d1, and c1 unattacked, White can castle queenside on the next move.
The Complete Legality Checklist
Castling on a side is legal only if every item below is true for that side.
- The king has not moved earlier in the game.
- The rook you want to castle with has not moved earlier in the game.
- Every square between the king and that rook is empty.
- The king is not currently in check.
- The square the king must cross is not attacked by an enemy piece.
- The square the king will occupy is not attacked by an enemy piece.
The FIDE Laws draw an important distinction between the first two items and the rest. If the king or the rook in question has already moved, the right to castle with that pair has been lost. It does not come back. If a square is occupied, or the king is in check, or a king square is attacked, castling is prevented temporarily. A blocked path can be cleared later, and a check can be answered, so castling may become possible on a later move. The two rooks are independent: moving your kingside rook loses kingside castling only, while moving the king removes both castling rights at once, because every castling move involves the king.
Every Case Where Castling Is Illegal
If your position matches any case below for the side you chose, do not castle on that side on that move. Check the other side, which may still be legal, or choose a different move.
The king or the chosen rook has already moved
If your king has moved at any point, you can no longer castle at all, even if the king later returns to its starting square. For example, if White plays Ke2 and later Ke1, kingside castling is still illegal, even if the rook never moved and f1 and g1 are empty. If the rook you want to castle with has moved, you can no longer castle with that rook, even if it later returns to its starting square. For example, Rh2 followed later by Rh1 does not restore kingside castling. Queenside castling may still be legal in that case, if the queenside rook and the king have not moved.
A piece stands between the king and the rook
If any piece stands on a square between the king and the rook, castling on that side is prevented while the piece is there. For kingside castling as White, a knight still on g1 or a bishop still on f1 blocks castling. For queenside castling as White, a knight still on b1, a bishop still on c1, or a queen still on d1 blocks castling. The blocking piece may be your own piece or an enemy piece. This condition is temporary: if the piece moves away and the other conditions are then met, castling may become legal.
The king is in check
You cannot castle while your king is in check. Castling looks like an escape, but it is not an escape from check. If your king is attacked on its current square, you must deal with the check first, by moving the king, capturing the attacking piece, or blocking the attack, as the position allows. Only after the king is no longer in check can you consider castling. Being in check earlier in the game does not by itself remove the right. If you answered an earlier check without moving the king, and neither the king nor the chosen rook has moved, you may still castle later. What matters is whether the king is in check on the move when you want to castle.
The king would cross or land on an attacked square
You cannot castle if the square the king must cross is attacked, or if the square the king will occupy is attacked. For kingside castling as White, the crossing square is f1 and the landing square is g1. For queenside castling as White, the crossing square is d1 and the landing square is c1. For Black, use f8 and g8 kingside, and d8 and c8 queenside. For example, if an enemy bishop attacks f1, White cannot castle kingside on that move, even if g1 is safe and the king is not in check. The three king squares, starting square, crossing square, and landing square, must all be free from enemy attack. Those are the rules against castling out of check, through check, and into check.
Castling that would capture or jump over a piece
Castling cannot capture a piece, and it cannot jump over a piece standing between the king and the rook. If a square between the king and the rook is occupied, the path rule already blocks the move. There is no version of castling in standard chess in which the king or the rook captures an enemy piece as part of the move, or leaps over an intervening piece.
Cases That Do Not Block Castling
Several positions look illegal but are legal. The FIDE wording restricts the attack test to the king’s squares, and that restriction explains each case below.
The rook is attacked
Castling is still legal if the rook is attacked, or if the rook crosses or lands on an attacked square, provided the king’s squares are safe. The attack test applies to the square the king stands on, the square the king crosses, and the square the king occupies. It does not apply to the rook’s squares. For example, White may castle kingside even if an enemy piece attacks h1, as long as e1, f1, and g1 are not attacked. Note the overlap: f1 is both a king crossing square and the rook’s landing square kingside, so an attack on f1 does block kingside castling, but because the king crosses f1, not because the rook lands there.
The b file square is attacked in queenside castling
In queenside castling as White, the king moves from e1 to c1 and crosses only d1. The king never stands on, crosses, or lands on b1. Therefore an enemy attack on b1 does not prevent queenside castling. The squares b1, c1, and d1 must all be empty, because the path rule requires every square between the king and the rook to be vacant, but only e1, d1, and c1 are tested for attack. The same applies to b8 for Black. Memorize this distinction: empty squares matter for the whole path, but attacked squares matter only for the king’s squares.
An attack in the past, and the other side
An attack in the past does not block castling. Only the position on the move when you want to castle matters for the attack test, except for the permanent loss of the right when the king or the chosen rook has actually moved. If an enemy piece attacked g1 last move but has since moved away, and the other conditions are met, you may castle kingside. Losing one castling right also does not lose the other, unless the king moved. Always check the side you actually want to play, piece by piece and square by square.
Castling that gives check
Nothing in the castling rules forbids a castling move that gives check to the enemy king, provided every castling condition is met. The rook’s move to its new square may open a line or occupy a square from which it attacks the enemy king. Such a move is still castling, written O-O or O-O-O, with a plus sign added if it gives check, and a hash sign if it gives checkmate.
How to Castle Over the Board and Online
Over the board, the physical order matters because of the touch move rule. Castling is a king move, so the king must be touched first. If you touch the king and then the rook, you must castle on that side if it is legal. If you touch the rook first and then the king, you are not allowed to castle on that side on that move, and the touch move rule is then applied to the rook. Pick up the king first, place it two squares toward the rook, then place the rook on the square the king crossed. Use one hand for the move, as the FIDE Laws require. If you need to adjust a piece without moving it, say that you intend to adjust it before touching it.
In tournament play, the move is considered made for castling when the player’s hand has released the rook on the square previously crossed by the king. If castling on that side turns out to be illegal after the king is released, you must make another legal move with the king, which may include castling with the other rook. Decide first and touch second.
Online, the interface usually completes the rook move for you: drag the king two squares toward the rook, or click the king and then its destination square, and the software moves the rook automatically. The exact gesture varies by app, so check the app’s help if a move does not complete as expected, rather than forcing the rook move as a separate move. The rules are the same online as over the board. Only the gesture changes.
How to Write Castling Down
Castling has its own notation, and it does not use the destination square of the king. Kingside castling is written O-O, using capital letter O as the portable game notation convention; FIDE Appendix C lists 0-0/0-0-0. Queenside castling is written O-O-O. A move number comes first, as with any move, for example 5. O-O for White’s fifth move castling kingside, or 5… O-O-O for Black’s fifth move castling queenside. If castling gives check, a plus sign is added, as in O-O+. If castling gives checkmate, a hash sign is added, as in O-O#. Do not write castling as a king move to a square, such as Kg1, on a scoresheet, even though some software will accept that input to enter the move. In standard algebraic notation, O-O and O-O-O are the record of the move. When keeping a scoresheet by hand, count the O symbols: two for kingside, three for queenside.
Common Mistakes and Practice Positions
Mistake one: moving the king one square and calling it castling. A one-square king move is an ordinary king move, not castling, and it means the king has now moved, so castling is lost. Count two squares before you touch a piece. Mistake two: moving the rook first over the board. Touching the rook first can prevent castling on that side on that move. Touch the king first, every time. Mistake three: castling while in check, or through check, because the position feels dangerous. Answer the check first, then recheck the conditions later. Mistake four: assuming an attacked rook blocks castling, and missing a legal castle. List the king’s three squares and test only those for attack, then test the whole path for empty squares. Mistake five: assuming an attack on b1 blocks queenside castling. It does not, as long as b1 is empty and the king’s squares are safe. Mistake six: castling into a position that is legal but soon becomes dangerous, without checking the pawn shield. Legality and wisdom are different questions: after confirming legality, ask whether the pawns in front of the castled king are intact and whether the enemy has pieces aimed at that side.
Try these practice checks. Practice one: White’s king is on e1, rook on h1, knight still on g1. Kingside castling is illegal, because a piece stands between the king and the rook. Practice two: White’s king is on e1, rook on a1, squares b1, c1, and d1 are empty, and an enemy rook attacks b1 but no enemy piece attacks e1, d1, or c1. Queenside castling is legal, because b1 is not a king square. Practice three: White’s king is on e1, rook on h1, squares f1 and g1 are empty, and an enemy bishop attacks f1. Kingside castling is illegal, because the king would cross an attacked square. Practice four: White’s king returned to e1 after moving earlier, rook on h1 never moved, squares f1 and g1 empty, no attacks on the king’s squares. Kingside castling is illegal, because the king has already moved. Practice five: White’s kingside rook moved earlier, queenside rook never moved, king never moved, squares b1, c1, and d1 empty, king’s queenside squares safe. Queenside castling is legal, because moving one rook affects only that rook’s right.
When to Castle, and When to Wait
The rules tell you when castling is legal. Judgment tells you when it is wise. The most widely taught guideline is to castle early, once the pieces between the king and the rook are developed and the king’s destination is not obviously under attack. Early castling removes the king from the center, where open files and diagonals can expose it, and it connects the rooks, meaning the rooks can support each other along the back rank once the pieces between them have moved. A king left in the center while the center opens is a common beginner weakness, and castling is the standard remedy.
Early does not mean automatic. Sometimes the center is closed, the king is safe for the moment, and developing another piece or answering a threat matters more than castling on that exact move. Sometimes castling to a side where the opponent has already aimed pawns and pieces would place the king behind a broken pawn shield. In that case, waiting, castling to the other side, or keeping the king in the center for a few more moves may be better. The legal checklist must come first. The strategic question comes second: after castling, will the king be safer than it is now, and will the rook be more useful than it is now?
Kingside castling usually leaves the king behind its own kingside pawns. Queenside castling often leads to opposite side castling, in which the players castle on opposite sides and each may attack the side where the enemy king sits. Artificial castling, walking the king to g1 or c1 with ordinary one-square moves after the castling right has been lost, can resemble a castled position, but it is not castling and does not restore the right.
Castling in Chess960, Briefly
Chess960, also called Fischer Random Chess, shuffles the back rank pieces before the game, with the king starting somewhere between the two rooks. Castling still finishes on the same squares as in standard chess: the king on g1 or c1 for White, and on g8 or c8 for Black, with the rook on the f or d file. The conditions mirror standard chess: neither piece may have moved, each piece’s own start-to-finish path must be vacant, though other squares may stay filled, and the king may not castle out of, through, or into check. Each player may castle only once in a game in Chess960.
Frequently Asked Questions
How do you castle in chess, in one sentence?
Move your king two squares toward one of your rooks, then move that rook to the square the king just crossed, provided the king and that rook have not moved, the squares between them are empty, and the king is not in check and does not cross or land on an attacked square.
Can you castle if your king has moved before?
No. A king that has moved has lost the right to castle, even if it later returns to its starting square.
Can you castle if your rook has moved before?
Not with that rook. You may still castle with the other rook, if that rook and the king have not moved and the other conditions for that side are met.
Can you castle out of check?
No. You must first get out of check by moving the king, capturing the attacking piece, or blocking the attack, as the position allows.
Can you castle through check?
No. The king may not cross an attacked square: f1 kingside and d1 queenside for White, and f8 and d8 for Black.
Can you castle if the rook is under attack?
Yes, provided the king’s squares are safe. The attack test applies to the king’s squares, not the rook’s squares, except where a square is also a king square, as f1 is in kingside castling.
Can you castle queenside if b1 is attacked?
Yes, for White, provided b1 is empty and e1, d1, and c1 are not attacked, and the other conditions are met. The king never visits b1 in queenside castling. The same applies to b8 for Black.
What is the difference between O-O and O-O-O?
O-O is kingside castling, also called short castling, with the rook finishing on the f file. O-O-O is queenside castling, also called long castling, with the rook finishing on the d file. The king moves exactly two squares in both cases.
Do you move the king or the rook first?
Move the king first. Over the board, touching the rook first can prevent castling on that side on that move. Online, drag or click the king two squares toward the rook, and the software usually moves the rook for you.
Can you castle more than once in a game?
No. The first castling move moves the king, and a king that has moved can no longer castle.
Sources & references
- FIDE, Laws of Chess taking effect from 1 January 2023, Article 3.8.2, castling definition, loss of the right to castle, and temporary prevention of castling. Page checked via the FIDE Laws text 29 October 2026. Covers the king moving two squares toward the rook, the rook moving to the square the king crossed, loss of the right if the king or the rook has moved, and prevention if the king's square, crossing square, or landing square is attacked, or if a piece stands between the king and the rook.
- FIDE, Laws of Chess, Article 3.9, the king in check. Page checked via the FIDE Laws text 29 October 2026. Covers the definition of check as attack by an enemy piece, and the rule that no move may place or leave the player's own king in check.
- FIDE, Laws of Chess, Article 4.3, Article 4.4, and Article 4.7, the act of moving the pieces. Page checked via the FIDE Laws text 29 October 2026. Covers one hand per move, the touch move rule for king and rook, the rule that touching the rook first prevents castling on that side on that move, and the point at which a castling move is considered made.
- FIDE, Laws of Chess, Appendix C, algebraic notation, and the Chess960 castling rules in the FIDE Laws. Page checked via secondary copies of the FIDE text 29 October 2026. Covers O-O/O-O-O as the portable game notation convention, FIDE Appendix C C.13.1-C.13.2 digit-zero forms 0-0/0-0-0, plus and hash signs for check and checkmate, and the Chess960 rule that castling finishes on the standard squares.
- FIDE Laws of Chess taking effect from 1 January 2023, hosted copy via the Ukrainian Chess Federation arbiter pages. Page checked 29 October 2026. Used to confirm the Article 3.8.2 wording and numbering in the current Laws.


